Washi tape projects offer a wonderful way to personalize your home decor effortlessly. Begin with washi tape wall art to create vibrant geometric patterns or mimic wallpaper, adding personality to any blank wall. Revamp furniture accents with washi tape for a fresh, modern look by layering tapes or keeping it simple. Add charm by customizing picture frames and decorative light switch covers, complementing existing decor. Turn plain plant pots into colorful masterpieces, and organize with stylish drawer dividers. Complete your decor with personalized coasters that reflect your style. With these projects, you'll uncover a world of creative possibilities.
Key Points
- Create vibrant wall art using washi tape for geometric patterns or abstract designs.
- Personalize picture frames with washi tape to match room themes and add visual interest.
- Revamp furniture accents by applying washi tape for a fresh and modern look.
- Transform plant pots into colorful decor pieces with washi tape in fun patterns.
- Enhance light switch covers quickly with washi tape for seasonal or style updates.
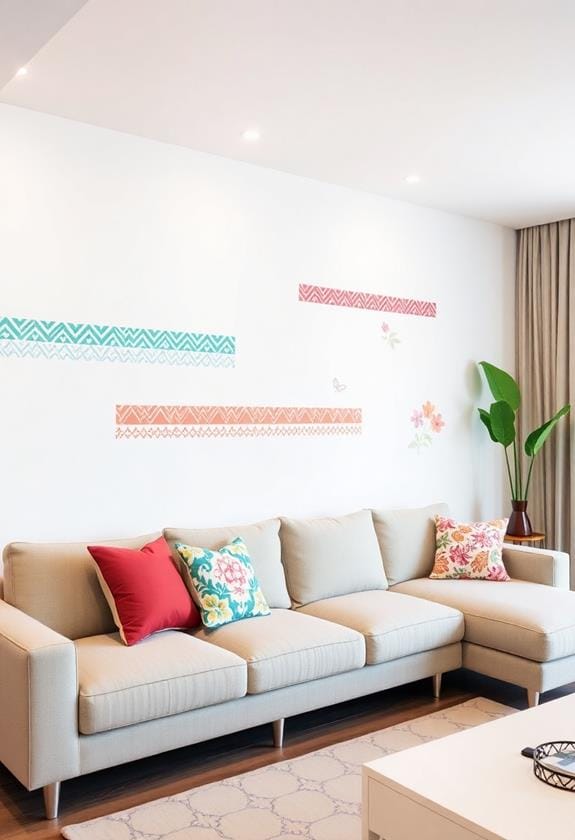
Washi Tape Wall Art

Transform your walls with a handful of washi tape, turning blank spaces into vibrant displays of creativity. This versatile and colorful tape offers endless possibilities for wall art, allowing you to express your personality without the commitment or mess of paint. You can create geometric patterns, abstract designs, or even replicate the look of a traditional wallpaper. Start by selecting a color palette that complements your existing decor, guaranteeing a harmonious balance in your space.
Begin your project by sketching a design on paper, planning how the colors and shapes will interact. Once you're satisfied, transfer this vision to your wall using washi tape, adjusting as needed. The beauty of washi tape lies in its forgiving nature—it's easy to reposition, so don't worry about getting it perfect on the first try. Simply peel it off and try again if necessary.
When applying the tape, press firmly to ascertain it adheres well, especially at the edges. This will prevent any peeling. Washi tape wall art not only adds a creative touch to your home, but it also allows you to refresh your decor as often as you like, keeping your space dynamic and personal.
Customized Picture Frames

When it comes to personalizing your home decor, customized picture frames with washi tape offer a delightful way to add flair to your favorite photos. You don't need to be an expert crafter to transform ordinary frames into eye-catching displays. Start by selecting a frame, either new or old, and choose washi tape patterns that match your room's color scheme or theme. With countless designs available—from florals to geometrics—you'll find the perfect tape to complement your decor.
Begin by cleaning your frame to guarantee the tape adheres properly. Then, decide whether you'd like to cover the entire frame or create a border effect. Carefully apply the tape, smoothing out any bubbles as you go. If the tape's width doesn't fit perfectly, you can overlap or trim it with scissors for a precise finish. Be mindful of corners; folding or cutting the tape neatly will offer a polished look.
Once you're satisfied with the design, consider adding a layer of clear sealant to prolong the tape's life. This simple project personalizes your frames, showcasing photos in a unique, stylish manner that reflects your personality.
Decorative Light Switch Covers

Amidst the many creative ways to spruce up your living space, decorating light switch covers with washi tape stands out as a quick and impactful project. You don't need to be a DIY expert to transform these often-overlooked elements into eye-catching features. By simply applying washi tape, you can add a splash of color or a touch of whimsy, instantly elevating the room's aesthetic.
Start by selecting washi tape patterns that complement your existing decor. Whether you prefer bold geometric designs, soft florals, or minimalist stripes, there's a washi tape to match every style. Carefully remove the switch cover, guaranteeing safety by turning off the electricity first. Clean the cover's surface to guarantee the tape adheres smoothly, then begin applying the tape. Wrap the tape around the edges, trimming any excess with a craft knife for a neat finish.
This project offers flexibility, allowing you to change designs with ease. Should your tastes evolve, simply peel off the old tape and apply a new pattern. This adaptability makes washi tape a fantastic tool for seasonal updates or when you feel the urge to refresh your decor.
Revamped Furniture Accents

Give your furniture a fresh, modern look with washi tape accents that are both stylish and easy to apply. Washi tape is a versatile material that can transform ordinary furniture into statement pieces, adding a pop of color or a touch of elegance. Whether you're looking to update a dresser, side table, or bookshelf, washi tape offers endless possibilities for creative expression. It's an affordable way to refresh your space without the need for paint or permanent changes. Plus, it's perfect for those who enjoy DIY home decor projects, giving you the freedom to change designs as often as you like.
To get started, follow these simple steps:
- Choose Your Design: Select a pattern or color scheme that complements your existing decor. Stripes, geometric patterns, or floral designs can add interest and flair to your furniture.
- Prepare the Surface: Clean the surface of your furniture to guarantee the tape adheres properly. Measure the areas you want to cover, and cut the tape to the desired length.
- Apply with Care: Carefully place the tape on the furniture, smoothing out any bubbles or wrinkles as you go. You can layer different tapes for a more intricate design or keep it simple with a single pattern.
With these steps, you'll create unique furniture accents that reflect your personal style.
Creative Plant Pot Designs

Transforming your plant pots with washi tape is an easy way to bring a burst of color and personality to your indoor or outdoor garden. With its endless patterns and vibrant hues, washi tape allows you to turn plain pots into eye-catching decor pieces. Start by selecting a pot, whether it's terracotta, ceramic, or plastic. Clean the surface thoroughly to guarantee the tape sticks well. Next, choose a washi tape design that complements your existing decor or adds a splash of contrast.
Begin by wrapping the tape around the pot, either in straight lines or fun patterns like chevrons or stripes. You can also use multiple tapes to create a layered effect, adding depth and interest. If you want a more intricate design, consider cutting the tape into shapes or using stencils to guide your creativity. Don't hesitate to mix and match colors and widths for maximum visual impact.
To guarantee the longevity of your design, especially for outdoor pots, apply a clear sealant over the tape. This step helps protect against moisture and fading. With just a few materials and a bit of creativity, you can easily refresh your plant pots and enliven your space.
Stylish Drawer Organizers

After enhancing your plant pots with vibrant washi tape, you can bring that same creativity indoors with stylish drawer organizers. Transforming your drawers is a great way to keep things tidy while adding a splash of color and pattern. Start by selecting washi tape that complements your room's design, considering both color and theme. For more affordable DIY home decor ideas, browse through various options available to fit every space in your home.
To create stylish drawer organizers, follow these steps:
- Measure and Prepare: Measure the dimensions of your drawer and cut cardboard or thick paper to fit as dividers. Cover these with washi tape, using different patterns to distinguish sections for various items.
- Decorate Drawer Interiors: Line the insides of the drawers with washi tape. You can use a single pattern for a cohesive look or mix and match for a more eclectic feel. Guarantee the tape is smoothly applied, avoiding bubbles or wrinkles.
- Label and Organize: Use small pieces of washi tape to create labels for each section. Write directly on the tape with a marker, helping you locate items quickly and efficiently.
Personalized Coaster Creations

Creating personalized coasters with washi tape is a fun and practical way to add a touch of personality to your home decor. You can transform plain, inexpensive coasters into unique pieces that reflect your style and creativity. Start by selecting a set of coasters in materials like cork, wood, or ceramic. Next, choose washi tape patterns and colors that complement your home's aesthetic.
To begin, clean the coaster surface to guarantee the tape adheres well. Then, meticulously apply the washi tape, creating stripes, geometric patterns, or even a patchwork effect—whatever suits your taste. You can overlap tapes for added texture or cut them into shapes for a more intricate design. Remember to press down firmly to eliminate air bubbles and guarantee a smooth finish.
Once you've completed the design, consider applying a waterproof sealant to protect your creation, especially if you plan to use the coasters for beverages. This step will guarantee the durability of your personalized artwork. These custom coasters not only serve a practical purpose but also act as conversation starters, showcasing your DIY prowess and adding a cozy, personal touch to your living space.
Frequently Asked Questions
What Surfaces Work Best With Washi Tape for Home Projects?
When you're working with washi tape, smooth, clean surfaces are your best friends. Try applying it to walls, glass, and wood, ensuring they're dust-free for the best adhesion. Avoid textured or porous surfaces like brick, as tape won't stick well. On furniture, make sure it's sealed and polished. For paper projects, normal card stock works great. Remember, always test a small area first to see how well the tape sticks.
How Do You Ensure Washi Tape Stays Adhered Over Time?
It's funny how a little preparation can make your washi tape projects last longer. First, clean the surface with a mild cleanser, ensuring it's dust-free. Apply a primer or a base layer of clear tape if you're dealing with textured areas. Press firmly along the tape's edges to secure it well. Avoid direct sunlight and moisture exposure, as these can weaken adhesion. With these steps, you'll keep your washi tape sticking beautifully.
Can Washi Tape Be Used on Outdoor Decor Projects?
Yes, you can use washi tape for outdoor decor projects, but you'll need to take some precautions to guarantee it lasts. Washi tape isn't naturally weather-resistant, so consider sealing it with a clear, outdoor-safe sealant. This adds a protective layer against moisture and sun exposure. Also, apply it to smooth, clean surfaces for better adhesion. Remember, even with these measures, washi tape might not withstand harsh weather over long periods.
Is Washi Tape Safe for Walls With Wallpaper or Textured Paint?
You might wonder if washi tape is okay for walls with wallpaper or textured paint. Generally, washi tape is gentle, making it less likely to damage surfaces, but it's always a good idea to test a small area first. On textured walls, the tape might not adhere as well, so consider using it for temporary projects. If your wallpaper is delicate, exercise caution, as the adhesive could cause slight peeling or residue.
How Do You Remove Washi Tape Without Damaging Surfaces?
To remove washi tape without damaging surfaces, start by peeling it off slowly at a 45-degree angle. If it's stubborn, gently heat the tape with a hairdryer on a low setting to loosen the adhesive. Be patient; quick removal can harm surfaces. If residue remains, dab the area with a cloth soaked in warm soapy water, then wipe it clean. Avoid harsh chemicals; they might damage the surface.


